Follow Me

  • 
  • 
  • 
  • 
  • 
  • 
  • 
  • 

Alanna George | The Craft Nest

a craft site for families

  • Home
  • Shop
    • Checkout
  • Craft Projects
    • Birthday Projects
    • Children’s Sewing Projects
    • Christmas Projects
    • Clay Projects
    • Easter Projects
    • Fall Projects
    • Felt Projects
    • Halloween Projects
    • Jewelry Projects
    • Painting Projects
    • Recipes
    • Recycling Projects
    • School Projects
    • Sewing Projects
    • Spring Projects
    • Summer Day Camp Projects
    • Thanksgiving Projects
    • Valentine’s Day Projects
    • Wedding Projects
  • Craft Printables
  • Advent Crafts
  • Handmade Gifts
  • Young Living
  • Craft Swaps

How To | Mother’s Day Recycled Windowsill Mini-Planter

April 30, 2013 by Alanna George Filed Under: How To, Recycling Projects, Spring Projects, Summer Day Camp Projects 1 Comment

Share this:

  • Email
  • Print
  • Tweet
  • Share on Tumblr

Kid Craft

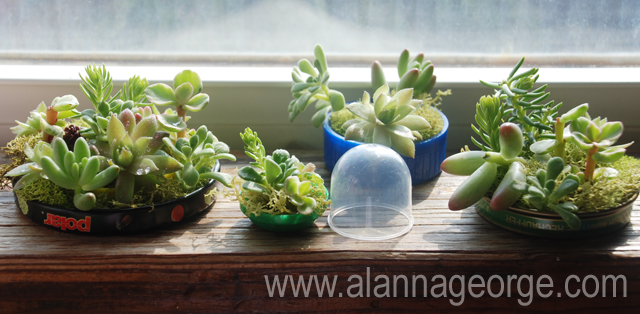
Mother’s Day is just around the corner and I am sure you are searching for a perfect handmade gift for mom. Am I right? What about a small gift for Grandma? These tiny little windowsill planters made using recycled lids or a domed vending machine container are just the perfect project for Mother’s Day. You may already have the plants you need in your yard.

I recently attended SNAP! (a blogging conference) and my roommate Cynthia taught a class on making a DIY terrarium necklace with succulent plants. She has an amazing tutorial you can find here, you will want to look at her tutorial before making this little windowsill planter. Her class and knowledge inspired me to make these windowsill planters to give as gifts for Mother’s Day.

DIY Mother's Day

Supplies:

  • Floral Adhesive (I bought it from my local flower shop)
  • Assorted Succulents (You may have enough in your own yard or visit Lowe’s)
  • Dried Moss (Michaels)
  • Toothpick or Bamboo Skewer
  • Paper Plate
  • Assorted Sizes Lids from Recycling Bin (Baby food lids are the perfect size)
  • Scissors

How To:

Gather succulents you want to use. I purchased mine from Lowe's. You may already have some in your yard, succulents like Hen and Chicks work perfectly for this project.

1. Gather succulents you want to use. I purchased mine from Lowe’s. You may already have some in your yard, succulents like Hen and Chicks work perfectly for this project.

2. Using a scissors, clip off a small piece of the succulents you want to use.

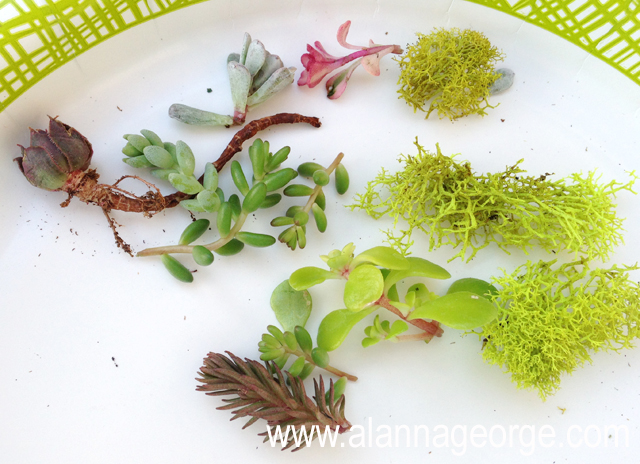
2. Using a scissors, clip off a small piece from each of the succulents you want to use.

Squirt a small spot of floral adhesive onto a paper plate.

3. Squirt a small spot of floral adhesive onto a paper plate.

4. Use a toothpick or bamboo skewer to pick up some adhesive and spread it around the inside of your lid.

4. Use a toothpick or bamboo skewer to pick up some adhesive and spread it around the inside of your lid. Floral adhesive does not harm the plant tissue.

5. Adhere moss to the adhesive. The moss will provide a place for your succulents to grow new roots.

5. Adhere moss to the adhesive. The moss will provide a place for your succulents to grow new roots.

6. Use your toothpick to pick up adhesive and dab the adhesive on the ends of the succulent cuttings. Glue the succulents into the moss.

6. Use your toothpick to pick up adhesive and dab the adhesive on the ends of the succulent cuttings. Glue the succulents into the moss. Above I layered two different size lids to make a unique mini-planter.

7. Be sure to read Cynthia’s maintenance tips for caring for your succulents in her post here. The basics are that you will need to mist your plants with water about once a week and be careful not to over water.


Comments

  1. Johnnie says:
    May 1, 2013 at 10:41 am

    Love it! I am adding this to my creative planters roundup. It is right up my alley. xo

    Reply

Leave a Reply Cancel reply

Your email address will not be published. Required fields are marked *

CAPTCHA Image
Refresh Image

*

I love educating customers about safe oil usage for families!
Tippy Stockton Jewelry

Creativity kits for kids!

Daily Boutique Deals

Creative scrapbooking in minutes with Smilebox.

Archives

USFamilyGuide.com `

Creative Commons License
This work is licensed under a Creative Commons Attribution-NonCommercial-ShareAlike 3.0 Unported License.

© Copyright 2007-2014, Alanna George. All rights reserved. For permission to reproduce contents or images from this site, please email alannageorge@alannageorge.com.

I was a Design Manager in the scrapbooking industry until the birth of my first child. I then turned freelance designer, crafter and stay-at-home mom. I reside in Michigan with my husband and our four kids. Read More…

Get Posts To Your Inbox

Enter your email address:

Delivered by FeedBurner

  • About Me
  • Advertise
  • Disclosure Policy
  • Linky Parties
  • Blogroll

Copyright © 2016 · Alanna George | The Craft Nest · Swank WordPress Theme By, PDCD

loading Cancel
Post was not sent - check your email addresses!
Email check failed, please try again
Sorry, your blog cannot share posts by email.